Browse all docs
Use adjustment layers and blend modes
An adjustment layer in PandaStudio applies one stack of color and effects to a stretch of the timeline, over the whole frame or one clip, and blend modes decide how it, an overlay or an FX mixes with the picture underneath.
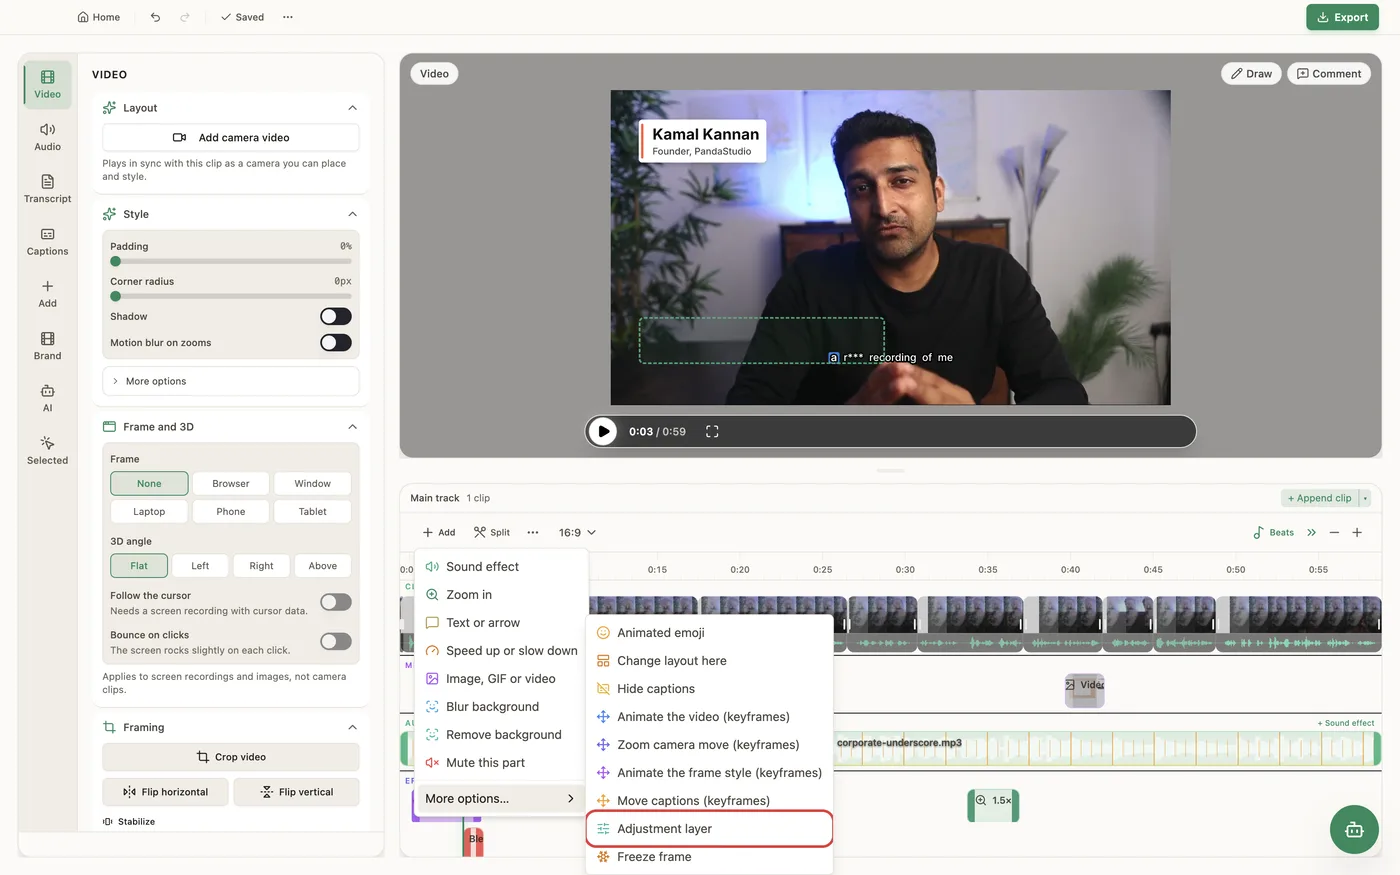
Click Add on the timeline toolbar, open More options… and choose Adjustment layer. It starts as a 3-second layer at the playhead with a little contrast and a vignette, and you drag its edges to cover the stretch you want. Applies to sets the scope: Whole frame (under captions) changes everything beneath it (video, camera, graphics, overlays) while captions stay on top, or pick one clip's video or camera to change only that layer. Choose a Look (the same LUT looks as Color Grade) with its Intensity, or click Fix flat footage to lift flat or log camera footage. Under More options: Quick fix (Brightness, Contrast, Saturation, Warmth), Fine color (Exposure, Contrast, Saturation, Temperature, Tint), Effects (Blur, Vignette, Grain, Glow, Color fringe), Animation, Blend, and Fade in (ms) and Fade out (ms). Click a value's diamond to keyframe it at the playhead, for example to fade a black-and-white look in, or animate Strength to bring the whole stack in and out. Blend mixes the adjusted picture back over the original: Blur with Screen gives a soft glow, Contrast with Overlay adds punch. There are 17 blend modes: Normal, Multiply, Darken, Color burn, Screen, Lighten, Color dodge, Add (linear dodge), Overlay, Soft light, Hard light, Difference, Exclusion, Hue, Saturation, Color and Luminosity. Image, video and graphic overlays have the same Blend mode setting under More options: Screen or Add drop a black background (light leaks, flares), Multiply drops white (ink, paper), Overlay and Soft light lay a texture into the video. FX use a blend mode too, Screen by default. Blending uses the same math in the preview and the export, and everything renders on your computer.
In the app
- 1Move the playhead to where the effect should start, click Add on the timeline toolbar, open More options… and choose Adjustment layer.
- 2Drag the layer's edges on the timeline to cover the stretch you want.
- 3In the Adjustment layer panel, set Applies to: Whole frame (under captions) or one clip's video or camera.
- 4Pick a Look and its Intensity, or open More options for Quick fix, Fine color and Effects such as Blur, Glow or Grain.
- 5Click a value's diamond to keyframe it at the playhead, set Fade in (ms) and Fade out (ms), and choose a Blend mode.
- 6For an overlay, select it, open More options in its panel and pick a Blend mode such as Screen for a light leak shot on black.
Ask the AI
Open the AI chat in the editor and say any of these. The agent does the edits for you.
CLI & MCP
Every capability is a verb, reachable from the terminal or from an MCP agent (Claude Code, Cursor, Cline, Continue, Claude Desktop).
pandastudio project.add-adjustment --id=$ID --atMs=30000 --durationMs=4000 --saturation=-1 --fadeOutMs=800
Edited ms. Whole frame by default; --clipId (and --layer=camera) limits it to one clip. Effects: look, lookIntensity, correction, exposure, contrast, saturation, temperature, tint, blur, vignette, grain, glow, chromaticAberration. Returns regionId.
pandastudio project.add-adjustment --id=$ID --atMs=0 --durationMs=5000 --blur=20 --blendMode=screen
Blur with Screen blended over the original gives a glow. --keyframes animates any value.
pandastudio project.update-adjustment --id=$ID --regionId=$ADJ --look=modernVibrant --lookIntensity=0.6
Pass only what changes; 0 or null removes an effect. Retime with project.update-region --regionType=adjustment.
pandastudio project.add-keyframe --id=$ID --target=adjustment --regionId=$ADJ --timeMs=0 --amount=0
amount animates the whole stack; you can also keyframe a single effect such as blur or saturation.
pandastudio project.update-region --id=$ID --regionType=overlay --regionId=$OVERLAY --blendMode=screen
The blend mode of an image, video or graphic overlay. Opacity and opacity keyframes apply before the blend.